
Multiple Time Frame Analysis for Better Forex Entries

Posted on
Multiple Time Frame Analysis for Better Forex Entries

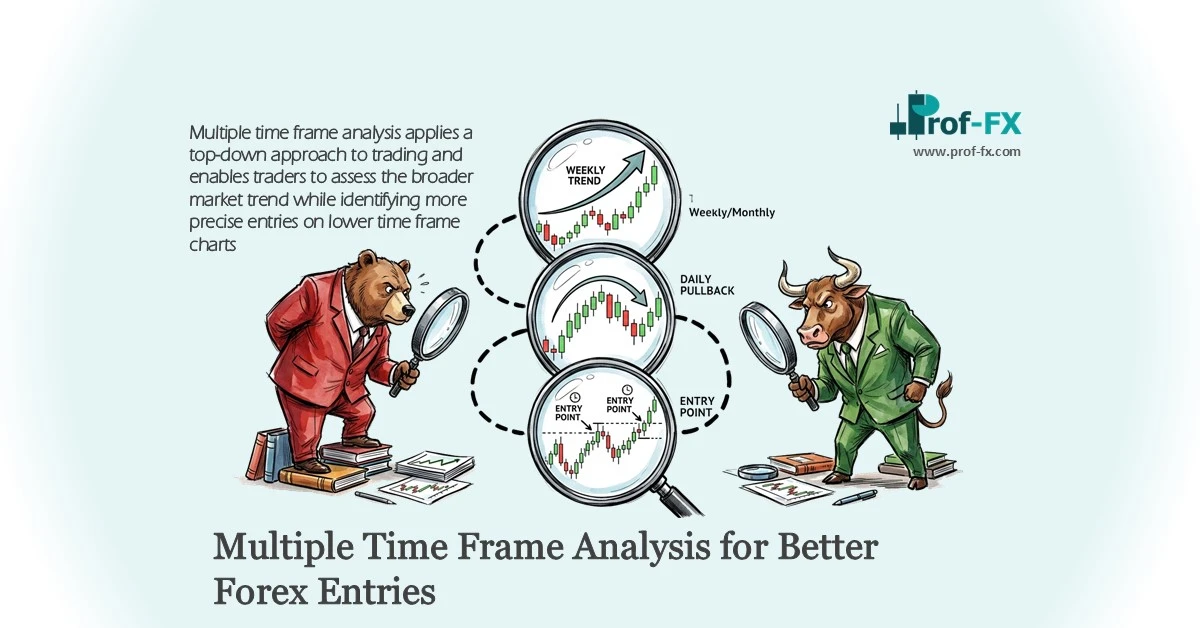
Multiple time frame analysis applies a top-down approach to trading and enables traders to assess the broader market trend while identifying more precise entries on lower time frame charts. Once the appropriate time frames have been selected, traders can perform technical analysis across multiple chart intervals to either confirm or invalidate their trading bias.

This methodology is widely regarded as one of the most effective frameworks in forex trading because it aligns macro trend direction with tactical execution timing.

Keep reading to learn more about:

  • what multiple time frame analysis is
  • which forex time frames can be applied
  • multiple time frame analysis techniques for day traders
  • multiple time frame analysis techniques for swing traders

What Is Multiple Time Frame Analysis?

Multiple time frame analysis, also known as multi-time frame analysis, is the process of examining the same currency pair across different chart intervals.

Typically, the larger time frame is used to establish the broader or longer-term trend, while the smaller time frame is used to identify more accurate market entries.

This allows traders to trade in the direction of the dominant trend while optimizing entry price, stop loss placement, and risk-to-reward ratio.

A commonly accepted rule of thumb is to use a 1:4 or 1:6 ratio when switching between time frames.

The logic behind this ratio is to capture smaller and more detailed price movements that can provide better-timed entries without losing sight of the larger market structure.

For example:

  • if the trend is analyzed on the 1-hour chart
  • the entry can be refined on the 15-minute chart (1:4)
  • or the 10-minute chart (1:6)

This structured relationship between time frames helps traders isolate short-term price fluctuations that are relevant to the broader setup.

That said, focusing on extremely small time frames without context can be counterproductive.

Very low time frames often contain market noise and random volatility, much of which has little influence on the larger trade thesis. This can lead to emotional decision-making and unnecessary stress, especially when price appears to move rapidly.

For instance, when using the hourly chart to identify trend direction, traders can zoom into the 10-minute or 15-minute chart for entry signals.

The lower time frame highlights short-term price developments, while the hourly chart remains the primary reference for monitoring overall trade progress.

How to Identify the Best Forex Time Frame

One of the most common questions among both beginner and experienced traders is how to determine the most suitable time frame for trading forex.

In general, the best time frame should be selected based on:

  • the amount of time available to trade each day
  • the time frame most commonly used to identify trade setups

For example, traders who can only dedicate approximately one hour per day to chart analysis are generally better suited to using the daily chart for trend analysis and the 4-hour chart for entry triggers.

On the other hand, traders with more time available to actively monitor the market can make effective use of smaller time frames, as they are able to analyze price action and react quickly when opportunities emerge.

Below is a general framework used by different trading styles:

Trader Style Holding Period Trend Chart Entry Chart
Long-term 1 day + Weekly Daily
Swing trader Few hours – few days Daily 4-hour
Short-term < 1 day 4-hour Hourly
Scalper < few hours Hourly 15-minute

Selecting the correct time frame is not merely a technical preference—it should reflect your schedule, temperament, and execution speed.

Multiple Time Frame Analysis Techniques for Day Traders

Day traders typically have the flexibility to monitor charts throughout the trading session and therefore can make use of much smaller time frames.

These commonly range from:

  • 1-minute
  • 5-minute
  • 15-minute
  • 1-hour

A common professional setup for day traders is:

  • Trend time frame: 1-hour chart
  • Entry time frame: 15-minute chart

Day traders can first analyze the 1-hour chart to establish directional bias.

If price is trading predominantly above the 200 Moving Average (MA) and continues moving higher, this generally supports a bullish trading bias.

Once this bias is established, traders can then zoom into the 15-minute chart to refine entries.

EUR/GBP One-Hour Chart Exhibiting an Upward Bias
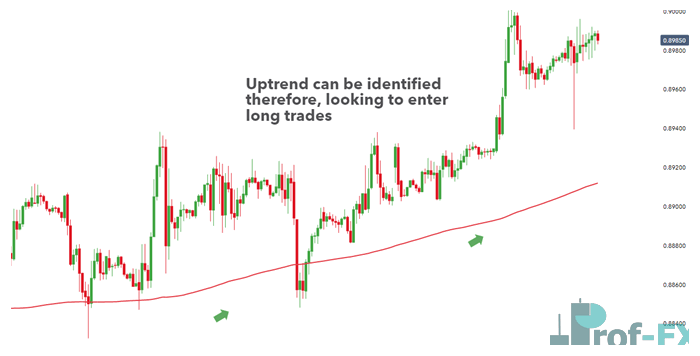
URGBP uptrend in aboce moving average

The 15-minute chart offers a more detailed view of short-term price evolution.

In this example, the uptrend remains clearly visible on the lower time frame, which further confirms the bullish outlook.

The two black arrows point to a contracting Bollinger Band® formation, which often precedes an expansion in volatility.

This compression phase is particularly important because it frequently leads to a directional breakout.

A professional long-entry approach would involve entering once price breaks above the upper Bollinger Band, while using either:

  • the 20-day MA
  • or the lower band

as a dynamic stop loss reference.

This structure allows for tighter risk control and better reward potential.

EUR/GBP 15-Minute Chart Showing Ideal Entry Into the Market
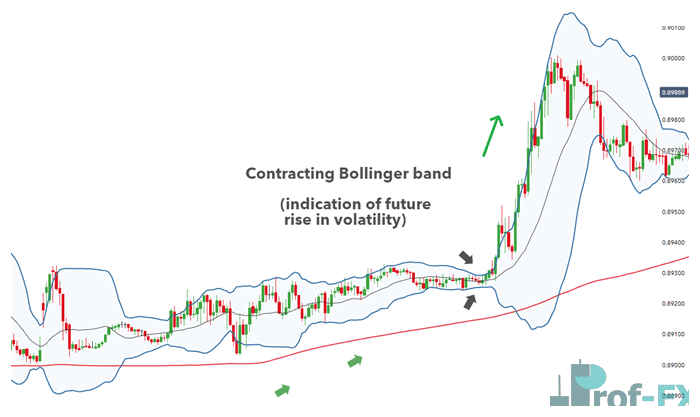
eurgbp M15 chart above moving average

This is a classic example of how lower time frame charts improve precision without changing the broader directional bias.

Multiple Time Frame Analysis Techniques for Swing Traders

Swing traders generally spend far less time monitoring charts compared to day traders—often one hour or less per day.

Because of this, they typically rely on higher time frames.

A common professional setup includes:

  • Trend time frame: Daily chart
  • Entry time frame: 4-hour chart

The daily chart is used to establish the broader trend direction.

Once the trend is identified, the trader zooms into the 4-hour chart to locate the most favorable entry.

EUR/GBP Daily Chart Exhibiting Downward Trend
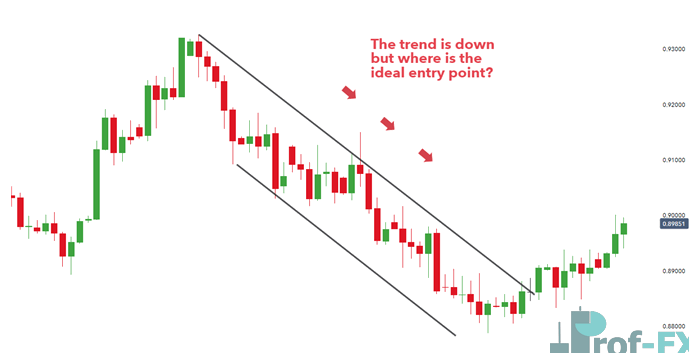
EURGBP Daily Chart downtrend

The daily chart clearly shows a bearish trend, but identifying the optimal short entry requires deeper analysis.

This is where the 4-hour chart becomes highly valuable.

By zooming in, traders can look for specific short-entry signals that align with the larger bearish structure.

EUR/GBP Four-Hour Chart Filtering Trades in Favor of Short Positions
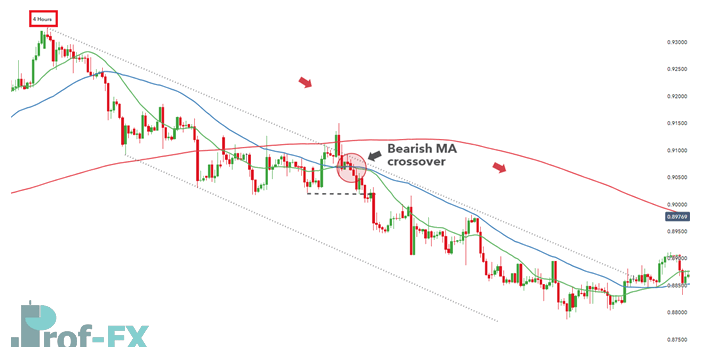
eurgbp H4 downtrend

On the 4-hour chart, the upper and lower channel lines are displayed as faint dotted lines to maintain chart clarity.

Following a failed breakout attempt, price falls back into the established trading range.

A failed bullish breakout is often considered a strong bearish confirmation signal because it indicates rejection of higher prices.

This failed move higher adds further conviction to the short setup.

Additional confirmation comes from moving averages:

  • price remains below the 200-day SMA
  • the 20 MA (green) crosses below the 50 MA (blue)

This bearish crossover provides the entry trigger.

From a technical standpoint, this is a high-quality short setup because:

  • it aligns with the broader trend
  • price rejects resistance
  • momentum confirms downside continuation

This multi-layer confirmation is what gives the trade a higher probability.

Further Reading on Time Frame Analysis

To become more comfortable with switching between chart intervals, it is highly recommended to practice using live charts regularly.

In addition, traders should identify which trading style best matches their personality and available time.

When determining the long-term trend, many professional traders rely on the 200-day Simple Moving Average (SMA) due to its long-established reputation as one of the most reliable indicators of long-term market direction.

From a professional trading perspective, multiple time frame analysis is not optional—it is a core discipline that helps traders align trend, timing, and risk management into one structured decision-making framework.
Forex Advertising rectangle - headway
Forex Advertising Package
Gravatar Image
Martin is a financial markets analyst and trader with over 15 years of experience across equities, options, futures, FX, and interest rates. His approach combines price-behavior analysis with disciplined risk management, offering traders clear, actionable insights. At Prof FX, Martin focuses on delivering practical market guidance and educational content that supports informed, process-driven trading decisions.

Leave a Reply

Your email address will not be published. Required fields are marked *

Related

SMA VS EMA

When selecting technical analysis tools for charting, traders frequently encounter two of the most widely used indicators: the Simple Moving

Opening Range Breakout Strategy build

Key Concepts Discussed in This Guide Understanding what the opening range represents in financial markets Why the opening range bias

The Most Traded Currency Pairs in Forex Market

As  you know, the Forex currency market is based on the buying and selling of currencies of certain countries. It

Risk Management Introduction to Risk Management Risk management is a fundamental component of any professional trading plan. Without a clearly defined and consistently applied risk framework, long-term success in forex trading is statistically unlikely. A structured approach to managing risk ensures that traders can navigate uncertainty while preserving capital and maintaining operational consistency. Risk Management Is Paramount to Success Effective risk management is not optional, it is essential. The primary objective for any trader is capital preservation, as survival in the market is a prerequisite for profitability. A well-defined strategy, combined with disciplined execution, significantly increases the probability of long-term success. For traders in the early stages, the priority is to minimize losses while gaining experience. Maintaining small, controlled losses allows for continuous participation in the market without jeopardizing the trading account. This phase is critical for building a sustainable foundation. For experienced traders, the focus shifts toward avoiding unnecessary drawdowns and eliminating the risk of account depletion (risk of ruin). Even with a profitable strategy, inconsistent application of risk management rules can significantly hinder account growth and performance stability. Individual Trade Management The amount of capital risked per trade should align with the trader’s risk tolerance and psychological comfort. Position sizing must be calibrated to ensure that decision-making remains objective and unaffected by emotional pressure. Excessive position size is a common cause of poor discipline. When too much capital is at risk, traders are more likely to deviate from their plan, leading to inconsistent outcomes. Therefore, controlling trade size is a critical factor in maintaining execution quality. Trading Size Based on Percentage at Risk A professional approach to position sizing is to think in percentage terms rather than absolute values. Instead of focusing on pip counts, lot sizes, or price points, traders should determine how much of their total capital they are willing to risk per trade. This approach introduces dynamic position sizing, where trade size adjusts based on the distance to the stop loss. For example: If risking 1% per trade A trade with a 50 pip stop will have a larger position size A trade with a 100 pip stop will have a smaller position size This ensures that risk remains constant, regardless of market conditions. Conversely, using fixed lot sizes leads to inconsistent risk exposure. Similarly, using fixed pip targets without regard to market structure can result in poorly placed stop loss and take profit levels that do not align with technical analysis. A simplified comparison highlights the importance of this method: Trade 1: Risk 1%, gain 2% → Net +2% Trade 2: Risk 1%, loss 1% → Net +1% overall This demonstrates that consistent percentage-based risk management produces positive expectancy, even with mixed results. Maintain Consistency in Risk Per Trade Consistency in risk-per-trade is critical. Significant variation, such as risking 0.5% on one trade and 3% on another, introduces instability and undermines performance tracking. While it is acceptable to slightly increase risk on higher-confidence setups, deviations should remain controlled and within a narrow range. The perceived probability difference between trade setups is often overstated, and over-adjusting position size based on subjective confidence can lead to unnecessary volatility in results. Win Rate Should Not Be the Primary Objective A high win rate is often misunderstood as the key to success. In reality, risk/reward ratio plays a more decisive role in long-term profitability. A structured approach typically targets a minimum risk/reward ratio of 1:2, meaning the potential reward should be at least twice the risk. For example: A 35% win rate with a 1:4 risk/reward ratio can outperform A 65% win rate with a 1:1 risk/reward ratio This demonstrates that asymmetrical risk profiles are more valuable than frequent small wins. Professional traders prioritize setups that offer a clear edge and favorable payoff structure. Factors in Determining Trade Size Several variables must be considered when defining position size: 1. Losing Streak Potential All trading strategies experience drawdowns. Certain strategies, such as breakout or momentum trading, may have lower win rates but higher reward potential. Others, like range trading or mean reversion, typically have higher win rates but lower risk/reward ratios. Traders must anticipate sequences of losses, potentially 10 or more, and ensure their risk model can withstand such scenarios without significant capital damage. 2. Trade Frequency Trade frequency directly impacts risk exposure: Low-frequency traders (e.g., swing traders holding positions for weeks) can afford slightly higher risk per trade High-frequency traders (e.g., day traders) must reduce risk per trade due to rapid accumulation of exposure Balancing frequency and risk is essential for maintaining account stability. Hard Stops Are Essential A hard stop loss, an order placed directly in the trading platform, is a critical risk control mechanism. There are three key reasons to use hard stops: Automation: Positions are protected even when the trader is not actively monitoring the market Discipline: Predefined exit levels enforce consistency and prevent emotional decision-making Protection from unexpected events: Sudden market volatility or news events can cause rapid price movements Relying on “soft stops” introduces unnecessary risk and reduces execution reliability. Account-Level Risk Management Risk management must extend beyond individual trades to encompass the entire trading account. This broader perspective ensures that cumulative exposure remains controlled. Correlated Positions Trading multiple correlated instruments increases effective risk exposure. For example: Holding multiple positions involving JPY pairs Trading assets with strong inverse relationships, such as USD and gold In such cases, positions should be treated as a single aggregated risk, as they may move simultaneously. Adjusting position size accordingly prevents unintended overexposure. Maximum Drawdown Limit Every trader must define a maximum acceptable drawdown, such as -10%, -15%, or -20%. When this threshold is reached: Stop trading temporarily Step back to evaluate performance objectively Identify and correct underlying issues Resuming trading should be gradual: Start with 25–50% of normal position size Focus on rebuilding confidence and consistency Return to full size only after performance stabilizes This structured recovery process prevents further losses and restores discipline. Trading Around High-Impact Fundamental Events Major economic announcements introduce heightened volatility. For trades based on technical analysis: Existing positions may be held if the trader accepts the additional risk A properly placed stop loss must always be in place If a trade setup appears shortly before a major event, it is generally advisable to delay execution until after the announcement. This reduces exposure to unpredictable price spikes and slippage. Conclusion Risk management is the defining factor between short-term participation and long-term success in forex trading. By controlling position size, maintaining consistent risk exposure, applying favorable risk/reward ratios, and managing overall account risk, traders establish a resilient framework for sustained performance. A disciplined risk management strategy does not eliminate losses, it ensures that losses remain controlled, predictable, and recoverable. In professional trading, this principle is non-negotiable.

Introduction to Risk Management Risk management is a fundamental component of any professional trading plan. Without a clearly defined and

Bearish Flag Pattern Trading Strategy Explained

The bearish flag pattern is one of the most commonly used trend continuation patterns in technical analysis. It helps traders

What Is a Margin Call in Forex Trading and How Traders Can Avoid

Margin calls are among the most feared events in forex trading. Experienced traders go to great lengths to avoid them,

How to Trade Bearish Reversals Using the Hanging Man Candlestick

Understanding Market Reversals in Forex Trading Sustained uptrends are among the most favorable conditions for traders, offering consistent opportunities to

Using margin in forex trading is a new concept for many traders – and one that is often misunderstood. Put